Written by Michael Crawley, BSc, BPT, CSCS
Anterior cruciate ligament injuries are a significant issue in sport, particularly among female and youth athletes. Female athletes have a significantly greater incidence of ACL injury compared to males, with research suggesting the risk may be between 2 and 8 times higher depending on the population studied (Herzberg et al. 2017).
A number of factors have been proposed to influence this increased risk. These include both extrinsic factors such as playing surface, and intrinsic factors such as biological, structural, and physical characteristics. This article focuses on the intrinsic side of the equation.
If you have not read Part 1, where we break down how ACL injuries occur and what influences risk more broadly, you can start here: ACL Injuries: How They Occur, Who Is at Risk, and Why Training Quality Matters
The key intrinsic factors that may influence ACL injury risk in the female athlete include:
hormonal influences
biomechanics and structural considerations
strength and neuromuscular control
It is also important to recognize that surgery is not the only solution following an ACL injury. The appropriate approach depends on the athlete’s age, injury severity, and the presence of additional damage such as meniscal or cartilage involvement. Graft selection is also influenced by these factors and plays an important role in long-term outcomes.
Menstruation and Hormones
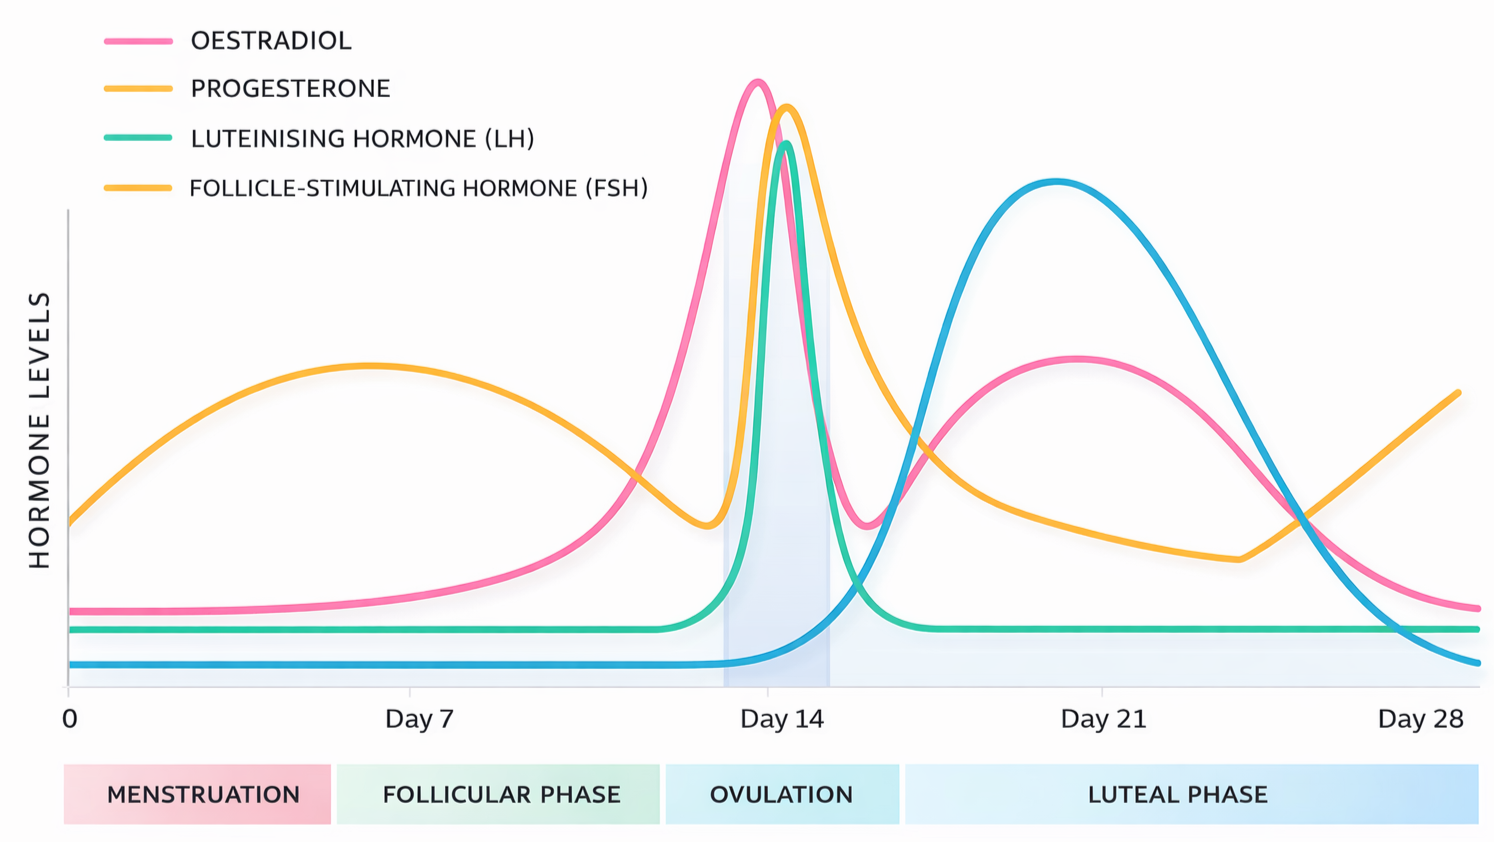
The menstrual cycle consists of three phases, each characterized by fluctuations in key hormones including estrogen, progesterone, and luteinizing hormone (Wojtys et al. 2002).
Follicular phase: approximately 9 days
Ovulatory phase: approximately 5 days, marked by peaks in estrogen and luteinizing hormone
Luteal phase: approximately 14 to 15 days, with elevated progesterone
Research in this area remains mixed. However, several studies have reported a higher incidence of ACL injuries during the ovulatory phase compared to other phases (Wojtys et al. 2002; Herzberg et al. 2017).
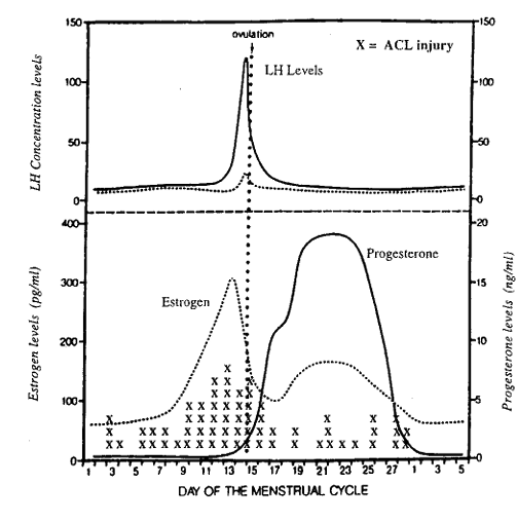
Wojtys et al. (2002) demonstrated a higher number of ACL injuries, marked as X on the figure above, in a group of young female athletes during the ovulatory phase. The mechanisms behind this relationship are varied and often disputed. At the neurological level, Kumar et al. (2013) demonstrated reduced reaction time to visual and auditory stimulus between the follicular and luteal phases.
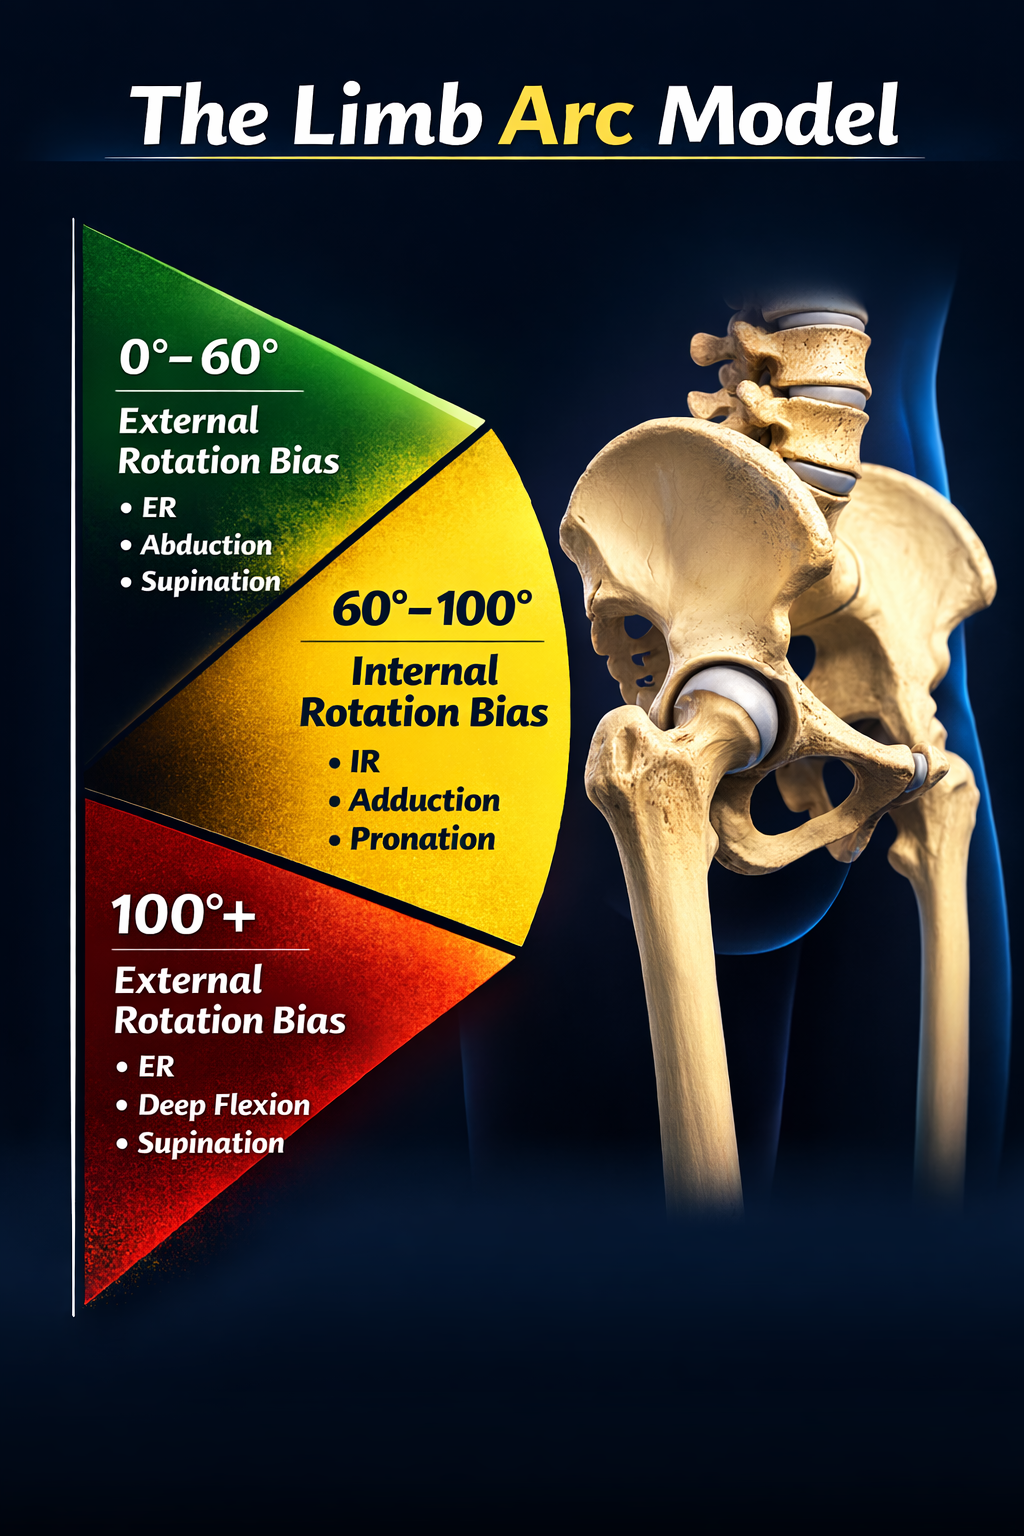
From a structural perspective, the ACL contains estrogen receptors, and cell culture research has demonstrated that estrogen can influence the ligament’s collagen composition. It is proposed that this may increase knee joint laxity. Maruyama et al. (2021) examined knee laxity across the menstrual cycle and found increased anterior knee laxity during the ovulatory phase.
However, this difference was only observed when participants were grouped into those with genu recurvatum and those without it, meaning athletes whose knees hyperextend 10 degrees or more versus those who do not. This adds another layer of complexity, as it suggests that biomechanical factors such as hyperextension may interact with hormonal factors such as higher estrogen levels rather than acting independently.
Relaxin is another important peptide hormone that has been specifically linked to injury risk in female athletes. It appears to work synergistically with estrogen, contributing to changes in ligament laxity (Berger et al. 2023; Parker et al. 2024).
Relaxin exerts its effects in two key ways:
increases type 1 collagen degradation
suppresses collagen synthesis
Given that ligaments are composed of approximately 40 to 50 percent type 1 collagen, this provides a plausible mechanism by which relaxin may influence ACL integrity. Alterations in the collagen structure of the ligament are one proposed explanation for increased laxity and injury risk.
Parker et al. (2024) also highlight a practical consideration. Relaxin levels tend to peak around days 21 to 24 of the menstrual cycle. In a coaching setting, this may present as an athlete reporting unexplained musculoskeletal discomfort around the knee without a clear training-related cause. This is not something to overreact to, but it can serve as a useful opportunity for education, monitoring, or short-term modification of training.
Across the cycle, these hormonal fluctuations may contribute to changes in reaction time, ligament laxity, and available joint range of motion. While some research has explored the use of oral contraceptives to regulate these hormonal variations and potentially reduce ACL injury risk (Herzberg et al. 2017), the quality of evidence remains low and is often confounded by multiple variables.
More importantly, as Parker et al. (2024) point out, oral contraceptives are not without trade-offs. While they may influence hormones such as relaxin and estrogen, there are more accessible and lower-risk interventions available. For most young female athletes, this is not where the focus should be.
Which leads into the next major factor: strength and neuromuscular training.
Strength and Neuromuscular Training
As female participation in sport has increased over the past few decades, there has been a corresponding increase in injury rates. At the same time, training age and exposure to structured strength and conditioning within a gym setting has generally lagged behind that of male athletes.
Well-rounded strength and conditioning is not only a tool to support and improve performance in sport. It can have a profound effect on robustness and coordinative qualities, helping to mitigate injury risk.
For a deeper look at how strength training should be structured for younger athletes, see: Building a Strong Foundation: The Crucial Role of Youth Strength and Conditioning
In young female athletes, several characteristics have been associated with increased ACL injury risk (Collings et al. 2022):
lower strength ratios between hip adductors and abductors
reduced trunk control
higher countermovement peak force values
This highlights the importance of a complete strength and conditioning plan. As young athletes improve jumping ability and increase power output, the risk of ACL injury and other issues such as patellofemoral pain may also increase (Myer et al. 2015; Collings et al. 2022).
Training for these athletes must address several components:
maximal strength and power
jumping and landing mechanics and technique
strength capacity
energy system development
Sugimoto et al. (2016) demonstrated that neuromuscular programs that include a combination of strength training, jumping, trunk control, and coordination significantly reduce ACL injury risk in young female athletes.
Practical Exercise Examples
Below are five exercises that cover several key qualities related to performance and injury mitigation:
Adjusting variables such as volume, intensity, range of motion, and frequency can make exercises like these highly effective across a range of sports and athlete levels.
Adherence, Enjoyment, and the Training Environment
Several factors can impact adherence in young female athletes:
time
enjoyment
coaching expertise
equipment access
Research suggests that even two 30-minute sessions per week in-season can meaningfully reduce ACL injury risk, provided a more comprehensive program is completed in the off-season (Sugimoto et al. 2016).
Enjoyment and coaching quality are closely linked. Engagement in the gym setting can be a challenge, particularly for younger athletes. Incorporating competition, variability, and game-based elements can improve buy-in and training consistency.
Reaction, Coordination, and Game-Based Training
The following examples can be used to improve reaction time, coordination, and strength:
These drills can be implemented in pairs, relay formats, or with sport-specific variations. They also expose athletes to a broader range of movement patterns.
This ties closely into long-term athlete development principles, which are outlined further here:
Build the Athlete First: Why Youth Athletes Need Physical Literacy Before Sport Specialization
An additional benefit of implementing games with different constraints and equipment is the development of energy systems and exposure to a wider range of motor patterns. The importance of this is two-fold.
Fatigue has been shown to impact landing control and hip-to-ankle force dissipation in female athletes (Mancino et al. 2024). Improving overall capacity can enhance an athlete’s ability to maintain reaction time and landing mechanics over longer periods.
Game and exercise constraints can also help offset the repetitive, high-volume actions seen in many sports. This becomes even more relevant in athletes who specialize early in a single sport.
Luo et al. (2025) found that early sport specialization increases injury risk, reduces long-term performance, and negatively impacts psychological outcomes. With a creative and experienced coach, the gym setting can serve as a valuable environment to address these gaps.
That said, even with a well-informed and diligent athlete who engages in strength training and participates in multiple sports, ACL injuries can still occur.
Surgical Route and Graft Selection
When a discussion has been made and surgery is deemed the best option, the next decision is graft selection. The importance of this choice lies in the fact that it is one of the few modifiable factors (Duchman et al. 2017). For the young female athlete, variables such as sex, age, and sporting demands cannot be changed.
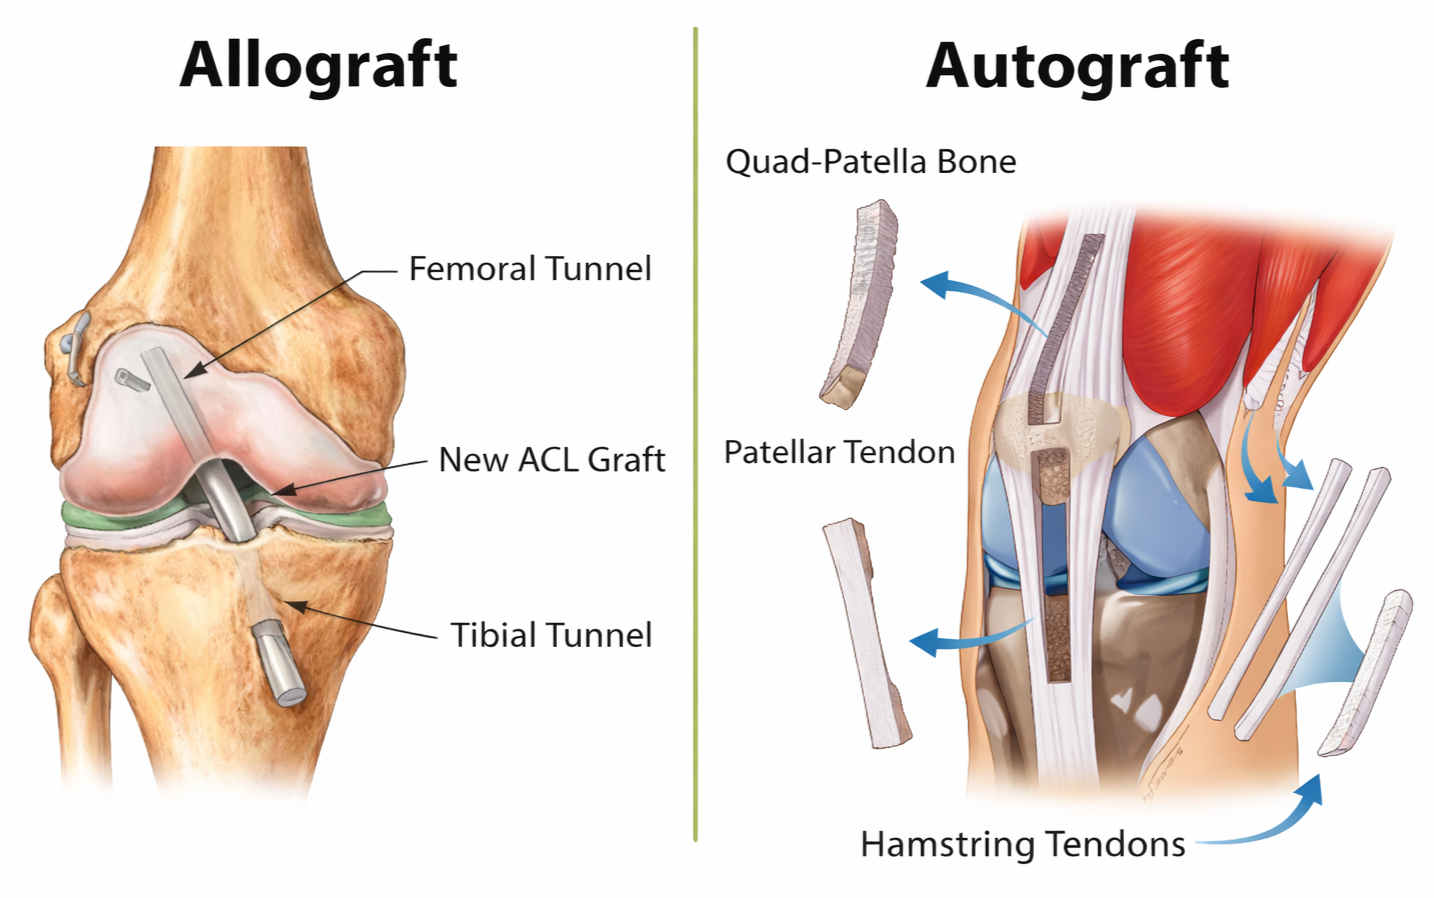
The main graft options include:
Autograft: tissue harvested from the athlete’s own body. Common options include hamstring tendon (HT), bone-patellar tendon-bone (BPTB), and quadriceps tendon (QT)
Allograft: donor tissue. Options can include tibialis anterior, Achilles tendon, hamstring, or patellar grafts (Duchman et al. 2017)
Pinheiro et al. (2022) conducted a large analysis in female athletes and found that bone-patellar tendon-bone grafts had a lower incidence of graft failure compared to hamstring grafts. This becomes more nuanced when age is considered.
Mancino et al. (2024) reported that BPTB grafts had lower re-rupture rates in females aged 15 to 20 compared to hamstring autografts. However, in athletes aged 21 and older, outcomes between BPTB and hamstring grafts were similar.
Graft revision risk is also an important consideration. Pinheiro et al. (2022) found that revision rates were 1.8 times higher in hamstring grafts compared to BPTB, increasing to 2.8 times in females under 18. This is particularly relevant, as revision surgeries tend to produce poorer outcomes compared to primary ACL reconstruction (Meena et al. 2024).
More recent evidence suggests that quadriceps tendon grafts produce comparable outcomes in terms of knee stability, functional performance, and re-tear risk (Meena et al. 2024).
Previous injury history should also influence graft selection. Lazarides et al. (2018) reported that a history of moderate to severe patellar tendinopathy was associated with increased graft failure when using BPTB grafts.
Similarly, hamstring autografts may contribute to post-surgical return-to-sport challenges (Bouzekraoui Alaoui et al. 2025), including:
persistent strength deficits compared to the uninvolved side
reduced maximum effective angle, a proxy for hamstring function and potential injury risk
In athletes with a history of recurrent hamstring strains or existing strength deficits, harvesting a hamstring graft from the involved side should be carefully considered. This may further complicate the already challenging process of restoring hamstring strength and function during rehabilitation.
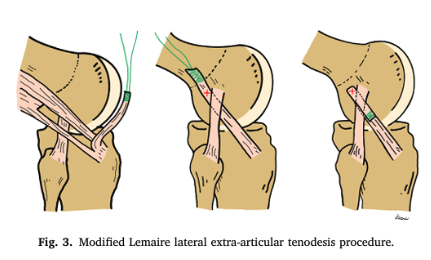
Additional Surgical Consideration: LET
Another surgical consideration is the lateral extra-articular tenodesis (LET), which may provide additional protection against re-injury. Recent research has identified specific factors where LET can help reduce risk and may be used as an added layer of structural support (Meena et al. 2024).
These factors include:
increased general knee ligament laxity
high tibial slope and increased knee hyperextension
return to high-demand sport
younger age
These considerations are particularly relevant for the young female athlete. As discussed throughout this article, hormonal influences on ligament laxity, along with structural characteristics such as knee hyperextension, are commonly observed in this population.
Using appropriate graft selection alongside LET where indicated provides an additional layer of structural support and may improve long-term outcomes in higher-risk athletes.
Summary
There is a complex interplay between hormonal, structural, and neuromuscular factors that may increase ACL injury risk in young female athletes. While many aspects of the research still require further clarity, it is clear that both modifiable and non-modifiable factors are at play.
There are several practical approaches that can help mitigate risk while also improving performance. As participation in female sport continues to grow, appropriate exposure to education, training, and support systems is no longer optional. It is essential.
Actionable Takeaways
Pre-season screening and strength testing, alongside ongoing in-season monitoring, can help identify and manage risk
Strength and neuromuscular training should be prioritized, including development of landing mechanics and force absorption
Coaches can use warm-ups and training creatively to expose athletes to a wider range of movement patterns, which can improve engagement and reduce repetitive strain
Avoiding early sport specialization where possible can support long-term performance and reduce injury risk
Graft selection should consider individual factors such as age and injury history, with input from both the physio and orthopaedic surgeon
Discussing additional surgical options, such as LET where appropriate, may improve outcomes in higher-risk athletes
Education for both athletes and parents is key. Increasing awareness and training age can have a meaningful impact on long-term development and injury mitigation
For athletes or parents looking for more structured support, this is where individualized assessment and programming can make a meaningful difference: Book an Initial Assessment