Mobility

Frozen Shoulder: Unravelling the Complexities and Providing Clarity

Written by Michael Crawley, BSc, BPT, CSCS

Nearly 100 years ago, Earnest Codman coined the term “frozen shoulder” and highlighted three clinical issues (Salamh et al. 2025):

  • Difficult to define

  • Difficult to treat

  • Difficult pathology to explain to patients

Those three points still hold true today.

Multiple structures and pathological findings have been implicated in the development of frozen shoulder. This includes the accumulation of immune system mediators, thickening of ligaments, and altered collagen translation (Pandey and Madi 2021). Clinically, this presents as a shoulder with reduced range of motion in both active and passive flexion, abduction, and external rotation (as seen in the image below).

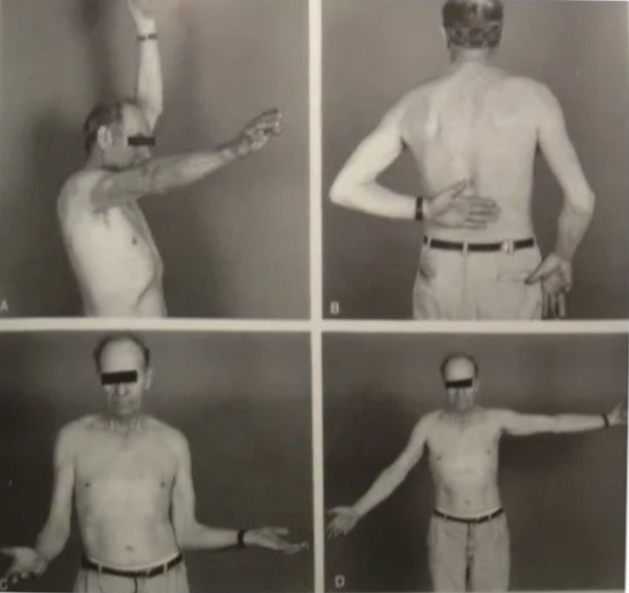
Figure 1: Reduced Shoulder range of motion (ROM) with frozen shoulder

The Real Impact of Frozen Shoulder

A scoping review examining how people experience and live with frozen shoulder demonstrates how debilitating and impactful the condition can be. King and Hebron (2023) identified five major themes:

  1. “Dropping me to my knees, due to the pain”

  2. Struggle for normality

  3. Emotional change for self

  4. Challenges through the healthcare journey

  5. Coping & adapting

This highlights that frozen shoulder is not just a physical limitation. It can significantly alter how someone functions and experiences their daily life.

Unfortunately, frozen shoulder demonstrates a bias towards a particular demographic. Females in the 40–60 age category take the brunt of diagnoses. To rub salt in the wounds, females are more likely to experience a more prolonged and symptomatic course compared to male counterparts.

Types of Frozen Shoulder

Frozen shoulder can be broadly classified into two categories (Pandey and Madi 2021):

Primary:
A stiff shoulder developing with no known cause. However, there are commonly linked conditions, most notably diabetes mellitus and thyroid dysfunction. The incidence of frozen shoulder can reach as high as 30% in individuals with diabetes.

Secondary:
A stiff shoulder with an underlying cause such as direct trauma (e.g. a fall), infection, or inflammatory conditions.

The Three Stages of Frozen Shoulder

Frozen shoulder follows a series of stages, delineated by changing symptoms (Date and Rahman 2020). While approximate timelines are often attached, there is significant variability, and for some individuals, full resolution may not occur within 3–5 years.

Freezing Stage (Stage 1: 2–6 months)

  • Predominantly characterised by moderate to severe pain and partial restriction of ROM

  • Early stages may present with pain and only terminal loss of ROM

This stage can be confused with rotator cuff tendinopathy. However, ROM does not progressively worsen in tendinopathy, whereas it continues to worsen with each follow-up in frozen shoulder.

Frozen Stage (Stage 2: 4–12 months)

  • Characterised by both pain and stiffness in varying proportions

  • Early phase tends to be more pain-dominant

  • Later phase becomes more stiffness-dominant

Thawing Stage (Stage 3: 6–26 months)

  • Characterised by minimal pain

  • Gradual resolution of stiffness

  • Progressive return of movement

Pathologically, this reflects a gradual reduction in inflammation and restoration of movement.

Treatment and Management Across the Stages

What actually works, and when it matters

The research on the effectiveness of treatments for frozen shoulder remains conflicting. However, a conservative approach is typically recommended as the starting point (Date and Rahman 2020).

Common interventions include:

  • Analgesics

  • Physiotherapy

  • Intra-articular injections

  • Suprascapular nerve block

Early Stage: Movement Within Tolerance

In the early stage of frozen shoulder, gentle stretching and mobility exercises within a pain-free range are advised (Date and Rahman 2020).

Creativity can play a key role here, as Louis Gifford, the brilliant pain specialist, stresses. In his book Aches and Pains, he explains how adjusting body position can influence the amount of pain-free range available to a limb.

The videos below demonstrates this concept. The key idea is simple:

  • The arm can move relative to the body

  • Or the arm can stay fixed while the body moves around it

Shoulder Range of Motion Wall Drills:
https://youtu.be/9_GwO7r24hM

Passive and active-assisted exercises can also be incorporated. These reduce the working stress on affected structures, allowing the humerus to move through range without generating or exacerbating pain.

Active Assisted and Passive Shoulder:
https://youtu.be/072jZDVW-ac

As Pain Settles: Introducing Strength

As pain begins to reduce and become more manageable, strengthening exercises can be introduced.

Here, the principle that “the dose and position make the poison” becomes particularly relevant.

Using isometrics in varying positions and directions allows for global loading through the shoulder while staying within tolerable limits.

Entry Level Isometric:
https://youtu.be/mDzgyyKlzZo

Later Stages: What Are Mobilisations Actually Doing?

Mobilisations performed by a physiotherapist in the later stages have shown some utility. However, the mechanism behind their effectiveness is contested.

For many years, the prevailing thought was that inferior mobilisation directly impacted the shoulder joint capsule. However, Jeremy Lewis, a well-known Australian shoulder specialist, has pointed out that a physiotherapist would need to generate approximately 600kg of force to meaningfully affect the capsule.

I am not aware of many Canadians with a 600kg deadlift.

The best approach at this stage would be to continue to progress strength training through pain free range.

Injections and Medical Management: Timing Is Key

Outside of physiotherapy, injections and pharmacological treatments are often used.

Nonsteroidal anti-inflammatories have shown little impact in the case of frozen shoulder. Intra-articular steroid injections, however, have demonstrated positive effects, particularly when used at the right time.

Again, Jeremy Lewis stresses that these injections must be used in the early stages, when pain is highest. This reinforces the importance of early and accurate diagnosis.

A similar pattern is seen with suprascapular nerve blocks, which can also have a positive effect on pain relief when applied early (Date and Rahman 2020).

Surgical Options: Often Less Helpful Than Expected

Surgical options are available, but often yield little additional benefit.

Beard et al. (2018) found no clinically significant benefit of shoulder arthroscopy compared to sham surgery. This was further supported by the large UK FROST trial (Corbacho et al. 2021), which reported that early physiotherapy was more cost-effective and accessible compared to invasive and costly surgical approaches.

Interestingly, manipulation under anaesthetic, which previously had negative connotations, has shown some efficacy. This likely relates to the reduction of muscle guarding and tension that can develop with frozen shoulder. When under anaesthetic, this guarding effect is temporarily removed.

Looking Beyond the Shoulder

An important point that is often not expressed or evaluated in the research is that frozen shoulder may be a sign of broader health issues, stemming from multiple systems in the body.

In many cases, it can act as a wake-up call to incorporate strength and conditioning into your lifestyle and address other health metrics.

You may not be able to train the affected side in the same way, but there are still many full-body exercises that can be performed without exacerbating the shoulder:

  • Towing a sled

  • Belt squat

  • Walking lunges

  • Step-ups

Why This Matters

There are three key reasons why this approach is important:

  1. Approximately 1 in 5 people go on to develop similar symptoms in the opposite shoulder (Pandey and Madi 2021)

  2. Sedentary individuals are more likely to receive a frozen shoulder diagnosis

  3. Well-designed strength and conditioning programs can positively influence the systems linked to frozen shoulder development, including endocrine, immune, and cardiovascular systems

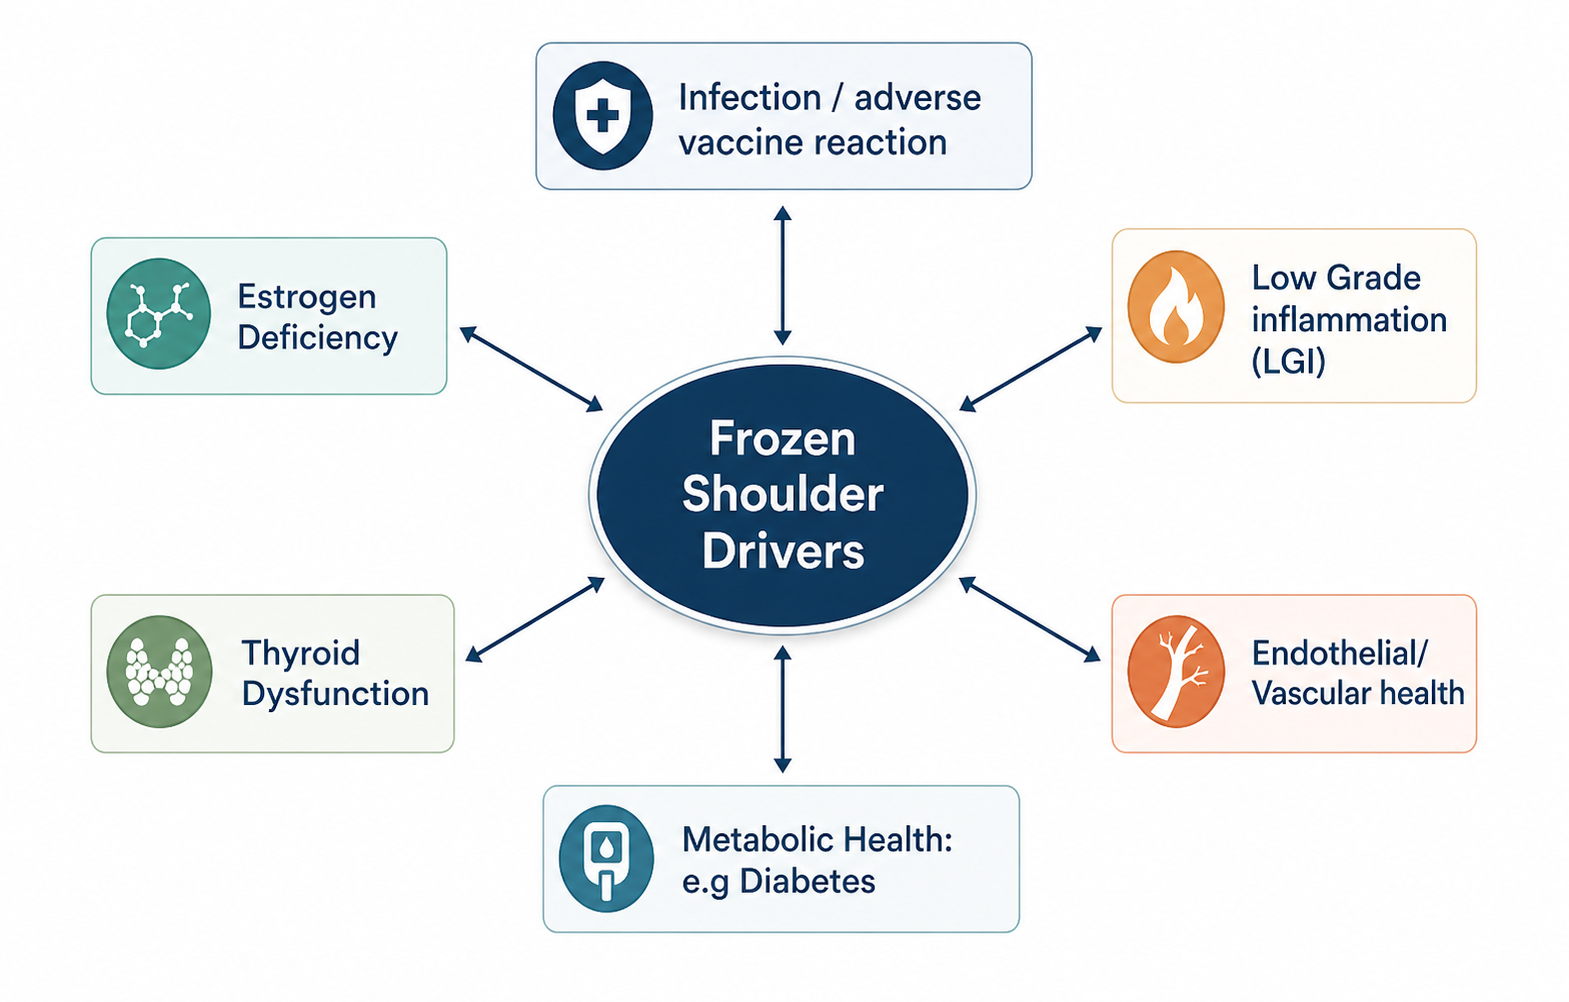
Deeper Dive into Causation and Management

Recent research has continued to highlight the multi-faceted nature of frozen shoulder and the challenges associated with its management (Navarro-Ledesma 2025a).

This is not a condition driven by a single structure or isolated tissue. Instead, it reflects the interaction of multiple systems within the body.

The diagram below highlights this well. Rather than being caused by one specific issue, frozen shoulder appears to sit at the intersection of several physiological systems, all of which can influence one another.

Estrogen and Menopause

One of the more consistent patterns seen in the research is the increased prevalence of frozen shoulder in peri-menopausal women. This has led to estrogen being identified as a key player in its development (Wend et al. 2012).

As shown in figure below, estrogen has effects that extend well beyond the reproductive system. Its influence spans multiple systems that are directly relevant to frozen shoulder.

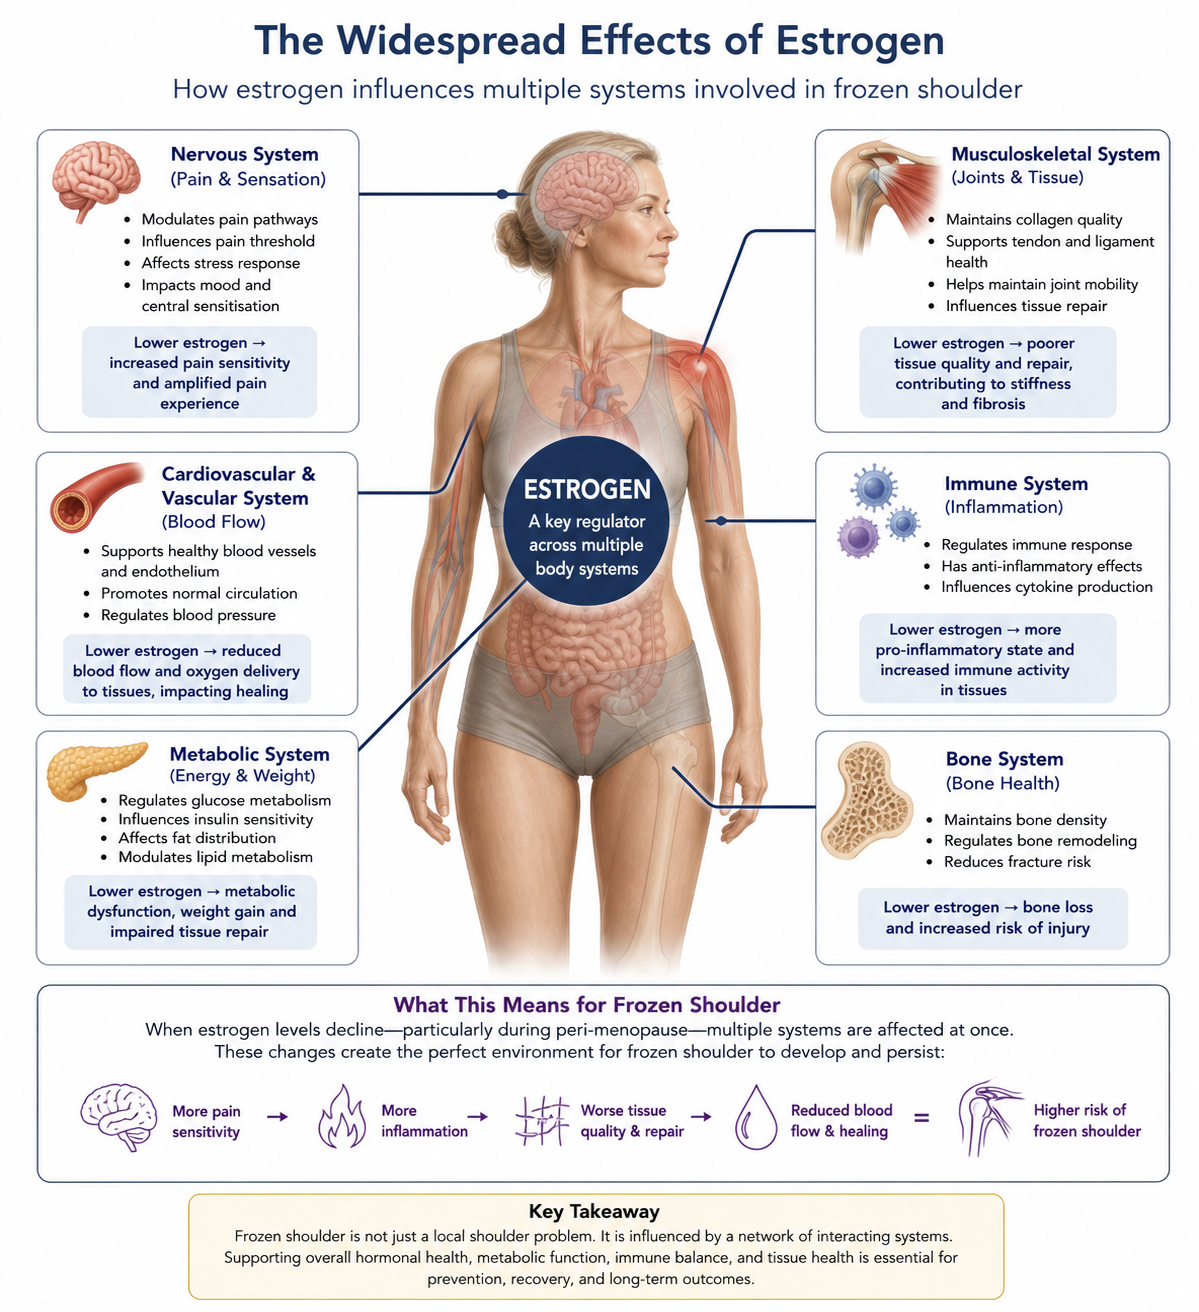
Neuroendocrine System

Declining estrogen levels can influence the nervous system through several mechanisms, impacting pain thresholds, resilience to stress, and central sensitisation.

A useful way to think about this is the “fire alarm” analogy.

You leave the bacon on the grill too long and the fire alarm goes off because of the smoke. There is no fire, but the system reacts as if there is.

With reduced estrogen levels, the threshold for triggering that “alarm” can become lower. The result is an amplified pain experience, even when the underlying tissue irritation may not fully justify it.

Metabolic System

Estrogen also plays a key role in fat metabolism, glucose regulation, and resistance to oxidative stress.

When these systems are disrupted, it can create an internal environment where tissue repair is compromised. This contributes to fibrosis, which is a hallmark of frozen shoulder.

Immune System

The same pattern continues within the immune system.

Declining estrogen levels tend to promote a more pro-inflammatory state. Immune system mediators accumulate within the tissues involved in frozen shoulder, and when combined with metabolic dysfunction, this can further drive the condition.

Targeting the System, Not Just the Shoulder

The research highlights how frozen shoulder is influenced by multiple systems, not just the shoulder itself. As a result, management is not limited to physiotherapy or surgical intervention alone.

There are a number of factors that could be explored here, but for the purpose of this piece, three of the more relevant and actionable areas will be discussed below.

Strength and Conditioning

Well-designed and properly implemented strength and conditioning programs have demonstrated positive impacts on estrogen levels, muscle mass, and fat mass in menopausal women (Razzak et al. 2019).

As mentioned previously, even with an impacted and painful shoulder, this does not mean avoiding training altogether or waiting for full resolution before doing anything.

The whole-body and multi-system benefits of strength training can influence long-term outcomes indirectly. While the shoulder itself may be limited, the broader physiological adaptations still matter.

Nutrition

Diet quality also plays a meaningful role.

A nutritional approach centred around higher-quality, minimally processed foods has been shown to impact symptom severity in individuals with frozen shoulder (Hamed-Hamed et al. 2026).

In practice, the decision to implement a structured strength training program often leads to improvements in other lifestyle behaviours, including dietary choices.

In the same way that hormonal, metabolic, and immune factors can drive the development of frozen shoulder, lifestyle decisions can push back against these drivers. This not only has the potential to improve current symptoms, but also to reduce the likelihood of future development.

Sleep and Circadian Rhythm

Circadian rhythm and sleep regulate inflammatory processes, hormonal release, and tissue repair (Navarro-Ledesma 2025a).

These are central to both general health and the development and recovery of frozen shoulder, as well as adaptation to strength training and exercise.

This is where the entanglement of systems becomes more apparent.

Bringing It Together

Sleep, exercise, and nutrition can be thought of as a three-legged stool. Each supports the others, and removing one weakens the entire system.

Addressing these factors will not provide an immediate solution to frozen shoulder. However, they can set the conditions for recovery and reduce the likelihood of recurrence, particularly when considering that approximately 20% of individuals will experience similar symptoms in the opposite shoulder.

Summary and Takeaways

Frozen shoulder is a systems issue, not just a joint problem

Frozen shoulder is not a local condition. It can have significant and long-term effects on both physical and psychological well-being.

In some cases, it can be so debilitating that it alters how an individual functions day to day. That may sound hyperbolic, but when revisiting the five themes outlined earlier, alongside the number of systems involved, it becomes more understandable.

Approaching treatment with a reductionist lens, relying solely on an injection or a home exercise program, is akin to using a hammer where a scalpel is required. This sentiment is supported in a recent review by Brindisino et al. (2026).

Effective management requires a more nuanced and personalised approach that considers the multiple drivers involved:

  • Hormonal (endocrine)

  • Immune system (autoimmune / inflammatory)

  • Strength, mobility, and capacity

  • Cardiovascular health

  • Pain psychology (sensitisation and emotional drivers)

  • Structural factors

  • Circadian rhythm and sleep

Key Takeaways

  • General strength training can still be completed and is beneficial with a frozen shoulder diagnosis

  • Surgical interventions are often unwarranted and do not demonstrate superior outcomes

  • Frozen shoulder is multi-factorial, and lifestyle factors such as exercise, nutrition, and sleep play a critical role in both management and risk reduction

References

Beard, D. J. et al. 2018. Arthroscopic subacromial decompression for subacromial shoulder pain (CSAW): a multicentre, pragmatic, parallel group, placebo-controlled, three-group, randomised surgical trial. The Lancet 391(10118), pp. 329-338. doi: 10.1016/S0140-6736(17)32457-1

Brindisino, F. et al. 2026. Beyond the capsule: an integrated perspective on the wide world of frozen shoulder. A collaborative viewpoint. Pain Management, pp. 1-20. doi: 10.1080/17581869.2026.2636725

Corbacho, B. et al. 2021. Cost-effectiveness of surgical treatments compared with early structured physiotherapy in secondary care for adults with primary frozen shoulder : an economic evaluation of the UK FROST trial. Bone Jt Open 2(8), pp. 685-695. doi: 10.1302/2633-1462.28.Bjo-2021-0075.R1

Date, A. and Rahman, L. 2020. Frozen shoulder: overview of clinical presentation and review of the current evidence base for management strategies. Future Sci OA 6(10), p. Fso647. doi: 10.2144/fsoa-2020-0145

Hamed-Hamed, D. et al. 2026. Impact of nutritional profile on pain and functionality in patients with frozen shoulder: a cross-sectional observational study. Frontiers in Medicine Volume 13 - 2026,  doi: 10.3389/fmed.2026.1785577

King, W. V. and Hebron, C. 2023. Frozen shoulder: living with uncertainty and being in “no-man’s land”. Physiotherapy Theory and Practice 39(5), pp. 979-993. doi: 10.1080/09593985.2022.2032512

Navarro-Ledesma, S. 2025a. Frozen Shoulder as a Systemic Immunometabolic Disorder: The Roles of Estrogen, Thyroid Dysfunction, Endothelial Health, Lifestyle, and Clinical Implications. J Clin Med 14(20),  doi: 10.3390/jcm14207315

Navarro-Ledesma, S. 2025b. Frozen Shoulder as a Systemic Immunometabolic Disorder: The Roles of Estrogen, Thyroid Dysfunction, Endothelial Health, Lifestyle, and Clinical Implications. Journal of Clinical Medicine 14(20), p. 7315. 

Pandey, V. and Madi, S. 2021. Clinical Guidelines in the Management of Frozen Shoulder: An Update! Indian J Orthop 55(2), pp. 299-309. doi: 10.1007/s43465-021-00351-3

Razzak, Z. A. et al. 2019. Effect of aerobic and anaerobic exercise on estrogen level, fat mass, and muscle mass among postmenopausal osteoporotic females. Int J Health Sci (Qassim) 13(4), pp. 10-16. 

Salamh, P. et al. 2025. An international consensus on the etiology, risk factors, diagnosis and Management for individuals with Frozen Shoulder: a Delphi study. J Man Manip Ther 33(4), pp. 309-320. doi: 10.1080/10669817.2025.2470461


Wend, K. et al. 2012. Tissue-Specific Effects of Loss of Estrogen during Menopause and Aging. Frontiers in Endocrinology Volume 3 - 2012,  doi: 10.3389/fendo.2012.00019

The Limb Arc Model: Why You Should Train the Range of Motion You Actually Own

Written by Evelyn Calado, MKin, CSCS, RKin

If you’ve ever wondered why:

  • Your knees cave in at the bottom of a squat

  • Your low back extends when the weight gets heavy

  • One hip always feels “stuck” at 90°

  • Or mobility drills don’t seem to transfer to strength

…you’re probably running into a concept explained by the Limb Arc Model.

This model, commonly attributed to Bill Hartman, describes how rotational bias changes across ranges of joint flexion — particularly at the hip. And once you understand it, exercise selection becomes dramatically more logical.

Let’s break it down.


What Is the Limb Arc Model?

The Limb Arc Model proposes that rotational leverage changes as a joint moves through flexion.

At the hip specifically:

  • Early flexion favors external rotation (ER)

  • Mid-range flexion favors internal rotation (IR)

  • Deep flexion returns to an external rotation bias

This is not arbitrary. It reflects changes in joint geometry, length tension relationships, and moment arms.

Most people train hip flexion as if it is one continuous quality. It is not. It is three mechanically distinct regions.

That shift matters for:

  • Squats

  • Deadlifts

  • Split squats

  • Gait mechanics

  • Sport performance

  • Injury risk

The Hip Flexion Arc Explained

Here’s the simplified breakdown:

0–60° Hip Flexion → External Rotation Bias

In early hip flexion, the joint favors:

  • External rotation

  • Abduction

  • Supination at the foot

  • Sacral counternutation

In gait, this corresponds most closely with early stance, when the heel has contacted the ground and the pelvis is relatively externally rotating as load is being accepted.

In the gym, this is the top portion of a squat or the early phase of a hinge.

External rotators and abductors have favorable leverage here.

60–100° Hip Flexion → Internal Rotation Bias

Around 90° hip flexion:

  • Internal rotators and adductors have improved leverage

  • Length–tension relationships favor IR

  • The piriformis shifts moment arm toward IR

  • The sacrum moves toward nutation

  • The foot transitions toward pronation

In gait, this corresponds most closely with mid stance, when the pelvis is internally rotating on the femur and vertical ground reaction forces are highest.

In a squat, this is typically around parallel.

100°+ Hip Flexion → Returns to External Rotation Bias

As you approach deep hip flexion:

  • The system transitions back toward ER

  • Supination strategies often reappear

  • External rotators regain leverage

This helps explain why some people feel “better” deep in a squat even if they struggle at parallel. They are returning to a range where external rotation leverage increases again.


Why Internal Rotation at 90° Matters

Most loaded bilateral lower-body exercises demand control around 60–100° hip flexion.

If internal rotation is limited in that range, common compensations show up:

  • Knee valgus

  • Lumbar extension

  • Butt wink

  • Hip shifting

  • Over-pronation

  • Gripping with toes

This is not always a strength problem.

It’s often a relative motion problem.

The joint is being asked to produce force in a range it does not control. When the femur is not internally rotating relative to the pelvis, the pelvis, spine, or foot moves instead.


“Train within the Range You Own”

Here’s where this becomes practical.

Owning a range means:

  • You can access it

  • You can control it

  • You can breathe in it

  • You can maintain joint relationships without compensating

If you lack IR at 90°, loading it heavily won’t fix it.

It may:

  • Reinforce compensations

  • Drive orientation strategies (like anterior pelvic tilt)

  • Increase compressive strategies instead of restoring motion

Instead, you might need:

  • Split squats that bias mid-stance

  • Exercises emphasizing medial arch contact

  • Internal rotation control drills

  • Breathing-based repositioning work

  • Heel references to restore early stance mechanics

Force production should follow motion restoration — not precede it. Ie; Restore control first. Then add load.


How This Applies to Programming

The Limb Arc Model gives you a filter for exercise selection.

The question is not whether someone “has internal rotation.”

The question is where in the arc they lose control.

If Control Breaks Down Between 0 and 60 Degrees

You will see:

  • Difficulty accepting load at the top of the squat

  • Poor heel contact

  • Immediate external rotation gripping

  • Early lumbar extension

In this case, reinforce early stance mechanics.

Use closed chain drills that emphasize heel reference and controlled external rotation.
Keep the hip in the zero to sixty degree range and teach load acceptance without extension strategies.

The goal is stable external rotation control in early hip flexion.

If Control Breaks Down Between 60 and 100 Degrees

You will see:

  • Knee valgus at parallel

  • Hip shift at ninety degrees

  • Lumbar extension at the sticking point

  • Loss of medial arch control

This is the most common presentation.

Here, you bias time spent in sixty to one hundred degrees of hip flexion in closed chain.


Split squat variations are useful when organized correctly because they allow:

  • Pelvis on femur relative motion

  • Clear stance leg reference

  • Control of hip flexion angle

  • Moderate load that does not overwhelm internal rotation capacity

The key is managing support and load so that the pelvis can internally rotate on the femur without defaulting into orientation strategies such as anterior pelvic tilt or lateral shift.

This is not about making someone balance harder.

It is about placing them in the internal rotation biased window and allowing them to control it.

If Control Breaks Down Beyond 100 Degrees

You will see:

  • Instability or collapse in deep squat

  • Over reliance on passive structures

  • Loss of tension in the bottom

In this case, gradually expose the athlete to deeper flexion under controlled conditions, restoring external rotation leverage without compensatory lumbar flexion.


Why This Model Is Powerful

The Limb Arc Model connects:

  • Gait

  • Breathing mechanics

  • Pelvic motion

  • Squat depth

  • Performance

  • Compensation patterns

It explains why:

  • One depth feels strong and another feels unstable

  • Deep squats don’t fix mid-range weakness

  • “Mobility” doesn’t always transfer to strength

Because leverage changes as joint angles change.

And if you don’t own the transition between those zones, the body will compensate.


Final Takeaway

The Limb Arc Model isn’t about stretching more.

It’s about understanding that:

Rotational demands shift as joints move through flexion.

And if you load a range you don’t own, your body will borrow motion from somewhere else.

Train the range you control.

Then expand it.

That’s how you build durable strength.

Learn more about how we assess movement and build individualized programs at Avos Strength.


Why You Should Rethink How You Row: The Truth About Shoulder Blade Cues

Written by Evelyn Calado, MKin, CSCS, RKin


You’ve probably heard it before:
"Pull your shoulder blades together.”
It’s a cue that’s been passed around gyms and group classes for years.

But here’s the truth: overemphasizing scapular retraction during pulling exercises — like rows and pulldowns — can limit shoulder health, breathing mechanics, and strength development.

If you care about moving better, not just lifting more, it's time to rethink how you row.

1. Over-Retraction Limits Ribcage Expansion

When you cue scapular retraction too forcefully during a row or pulldown, you compress your upper back and limit ribcage movement. This restricts natural thoracic mobility and can impact your ability to breathe and move efficiently under load.

👉 See more on mobility training

2. It Disrupts Scapulohumeral Rhythm

The scapula and humerus are designed to move together in a fluid, coordinated rhythm. Forcing the shoulder blades into retraction first interrupts that sequence. This increases joint stress and decreases the efficiency of your movement — especially in horizontal pulling patterns.

3. You Miss Out on Serratus Activation and Posterior Expansion

When you stop at scapular retraction, you lose out on the benefits of a full reach — which promotes serratus anterior engagement and helps open up the back of the ribcage. This reach improves shoulder function and breathing capacity, particularly for clients struggling with postural restrictions or breathing mechanics.

4. It Reinforces Compensatory Movement Patterns

Cues like "pinch your shoulder blades" often drive people into extension-based strategies — excessive lumbar arching, rib flaring, and overuse of the lats and lower back.

Instead, focus on staying stacked: ribs over pelvis, neutral spine, and movement that flows from a stable foundation.

👉 Learn more about injury prevention strategies

What Proper Row and Pulldown Mechanics Look Like

  • Elbow leads the movement — not the scapula

  • Scapula glides naturally with the arm

  • Reach at the start and end for full range

  • Spine stays neutral, not overextended

  • Breathing stays consistent throughout the set

Better Cues to Use Instead

  • “Elbow to back pocket.”

  • “Let the shoulder blade follow the arm.”

  • “Reach at the end — don’t stop at the shoulder blade.”

  • “Stack your ribs over your hips.”

Want to train smarter?

If you’re tired of outdated cues and want coaching that prioritizes biomechanics, breathing, and real-world strength — we can help.

👉 Explore our Personal Training or Hybrid Coaching Programs

Let’s build strength that lasts.
Contact Us to get started.

How Many Steps Should You Walk a Day?

Walking is often recommended as a simple yet effective form of exercise. But how many steps should you aim for each day? Whether you're counting steps or tracking minutes, the answer varies based on your fitness level and goals. Let’s break down the benefits of walking and why this common movement is important for everyone, regardless of conditioning level.

The Benefits of Walking

Walking is one of the most natural movements for humans. Our bodies are designed to walk, and in today’s increasingly sedentary world, we need to move more than ever. Walking is often undervalued, but it offers many benefits, including:

  • Improved Mental Health: Regular walks, especially outdoors, can reduce stress, anxiety, and symptoms of depression.

  • Better Joint Health: Walking helps lubricate the joints, which can reduce stiffness and discomfort, particularly in those with arthritis.

  • Increased Caloric Burn: While walking may not burn as many calories as intense exercise, it can still help with weight management.

  • Enhanced Cardiovascular Health: For some individuals, walking is an excellent way to improve heart health.

Walking in Nature: A Double Benefit

Walking in nature offers an additional layer of benefits. Research shows that being in green spaces can reduce stress, lower blood pressure, and improve mood. The color green has a calming effect on the nervous system, promoting relaxation and reducing anxiety. Walking among trees, plants, and natural landscapes allows you to reset mentally, giving your brain a break from the overstimulation of daily life. So, if possible, try to walk outside in nature to enjoy these mental and emotional benefits.

Walking: Is It Always Cardio?

For someone who is deconditioned (hasn’t exercised regularly), walking can provide a significant cardiovascular benefit. It can elevate their heart rate into a zone where their body adapts, improving their heart and lung capacity over time. This makes walking an accessible entry point into fitness for many.

However, for those who are more conditioned, a leisurely stroll is unlikely to challenge the cardiovascular system. While walking remains beneficial, it may not elevate the heart rate high enough to prompt the adaptations typically associated with cardiovascular exercise. In these cases, faster-paced walks, hills, or other forms of more intense exercise may be needed for those specific cardio benefits.

Walking Isn’t Just About Cardio

Even if walking doesn’t improve your cardiovascular fitness, it’s still important for overall health. Walking is essential for mobility, circulation, and mental clarity. Regular walking helps combat the harmful effects of sitting, which has been linked to various health risks, including heart disease, diabetes, and even premature death.

Walking helps you stay active throughout the day, which is more important than you might think. Modern lifestyles tend to be highly sedentary, with long periods spent sitting at work, in transit, or at home. Even if walking doesn’t challenge your cardiovascular system, it’s an essential habit for staying healthy.

Don’t Forget to Swing Your Arms!

Another often overlooked aspect of walking is the importance of swinging your arms. In our modern world, where many of us hold our phones or keep our hands in our pockets, the natural arm swing can easily be forgotten. However, swinging your arms as you walk is essential for proper body mechanics. It promotes torso rotation, helping your spine move more naturally, and increases hip extension, allowing for a more efficient gait. This arm movement also helps balance and propel your body forward, making your walk more effective and biomechanically sound.

How Many Steps Should You Aim For?

You've likely heard the recommendation to walk 10,000 steps a day. However, this number is somewhat arbitrary. It originated from a Japanese marketing campaign in the 1960s and has since become a widely accepted target. But it’s not a magic number.

The truth is, your step goal depends on where you’re starting from. If you’re currently not walking much at all, aiming for 10,000 steps right away may feel overwhelming. Instead, start with a smaller, more manageable number. For example, 6,000 steps per day could be a great starting point for some people. Over time, gradually increase your step count as your fitness level improves.

Walking in Terms of Minutes

If you prefer tracking time rather than steps, the Canadian Physical Activity Guidelines recommend that adults get at least 150 minutes of moderate-to-vigorous aerobic activity per week, which can include brisk walking. This breaks down to about 30 minutes of walking five days a week. You can split this into shorter bouts throughout the day to make it more manageable.

However, remember that for walking to count as moderate activity, it needs to raise your heart rate. For someone who’s conditioned, a brisk pace or walking uphill may be necessary to achieve this.

What Does the Science Say?

Recent research supports the idea that you don’t need to hit 10,000 steps daily to reap the health benefits. A 2021 study published in the journal JAMA Network Open found that walking 7,000 steps per day was associated with a lower risk of mortality compared to fewer steps. Other studies suggest that even 4,000-5,000 steps per day can improve health outcomes, especially when combined with more vigorous activity.

The key takeaway from recent literature is that every step counts, and the more you walk, the better. However, pushing yourself to an arbitrary goal like 10,000 steps may not be necessary, especially if you’re starting from a lower baseline.

Start Where You Are

If you’re new to walking or have been inactive, don’t be discouraged if you’re not hitting 10,000 steps. Start with what’s achievable for you. If that’s 2,000 steps a day, that’s great! Gradually increase your steps each week as your fitness improves. You’ll still enjoy significant health benefits even at lower step counts, and consistency is more important than perfection.

The Bottom Line

Walking is one of the most accessible forms of movement available to us, but its impact depends on your fitness level and goals. For some, it’s an excellent cardiovascular workout, while for others, it’s a way to stay active, improve mental clarity, and combat the sedentary lifestyle. Instead of focusing on an arbitrary number of steps, find a level that works for you and build from there. Whether it’s in terms of steps or minutes, walking more is always a step in the right direction—just don’t forget to swing your arms and, if possible, get out in nature!

Uncovering the Hidden Cause of Scapular Winging: A Comprehensive Approach

Have you ever noticed your shoulder blade sticking out awkwardly? This is called scapular winging. You might have been told that it’s due to a problem with your serratus anterior and that reaching or punching exercises are the key to fixing it.

However, there’s more to the story. Most advice on scapular winging overlooks a critical element that can make all the difference.

The Overlooked Role of the Scapulothoracic Joint

While much attention is given to the muscles surrounding the scapula, the ribcage, which acts as their stage, is often ignored. The scapula is concave, needing a convex surface to move smoothly. This surface is provided by the ribcage.

But what happens when there are restrictions in the ribcage? The ribcage might position itself forward in relation to the scapula, creating the appearance of scapular winging. This isn’t a problem with the scapula itself; rather, the shoulder blade lacks a stable platform to move upon.


The Rotator Cuff’s Dual Function

Commonly, the rotator cuff is thought to solely influence the shoulder joint. Yet, these muscles also play a significant role in moving the scapula. The posterior rotator cuff muscles, specifically the infraspinatus and teres minor, facilitate internal rotation of the scapula. This movement can make the inner border of the scapula lift away from the ribcage, mimicking scapular winging.

When there is insufficient space between the scapula and the thorax, these muscles are forced to multitask, acting on both the humerus and the scapula.

Understanding Ribcage Expansion

The relationship between the thorax and scapula is well-documented. Poor posture, which often limits ribcage expansion, can greatly reduce shoulder mobility. When the ribcage doesn't expand adequately, it restricts scapular movement and places additional stress on the humerus. Therefore, enhancing ribcage expansion is crucial to improving overall shoulder function including scapular winging.

Step by Step Process to Help Improve Ribcage Expansion

To effectively address scapular winging, we must enhance ribcage dynamics through a specific sequence of exercises:

1. Increase Front-to-Back Thoracic Shape (Anterior and Posterior Expansion)

2. Fill the Gap Between the Ribs and Shoulder Blade (Upper Back Expansion)

3. Retrain Scapular Gliding (Chest Expansion and Glenohumeral Mechanics)

Step 1: Front-to-Back Expansion

Enhancing the front-to-back dimension of the ribcage can be achieved through a side-lying position with a foam roller:

Setup: Position a foam roller at the middle third of your ribcage, approximately at chest height. Use a pillow for comfort if necessary to support your head.

Position: Lie on your side with your knees stacked.

Action: Roll forward and slightly sidebend over the foam roller, you can reach forward as shown in the video or reach your top arm toward the ceiling while looking at your hand. You can even hold a dumbbell or kettlebell in an arm bar position while on the roller.

Breathing: Inhale silently through your nose. On the exhale, relax into the foam roller.

Reps: Perform 2-3 sets of five breaths, twice daily for 2-4 weeks

Step 2: Upper Back Expansion

Next, we aim to create space between the ribs and the shoulder blade by driving upper-back expansion: (Rolling drills are great for achieving this)

Setup: Set up depends on the variation, for the first variation, sit on the floor with both feet in front of you.

Position: Hold onto your legs by grabbing behind your knees, keeping your eyes forward.

Action: Inhale and roll backward, then exhale and roll forward, keep a nice rhythmic tempo.

Reps: Do 3 sets of 8-12 rolls (per side), a few times daily for 2-4 weeks.

Step 3: Chest Expansion

To facilitate proper scapular movement, we need to expand the front of the chest. The "pump handle" action of the ribcage can be stimulated using a downward dog position:

Setup: Begin on your hands and knees with hands below shoulders and knees below hips.

Contact Points: Focus on the pisiform (small wrist bone) and the base of the index finger.

Action: Exhale and lift your hips upward while keeping weight on your hand points and looking toward your feet.

Breathing: Inhale silently through your nose. On the exhale, press more heavily through the hand points.

Note: unlike the video you can also pause and breathe in the top position.

Reps: Perform 2-3 sets of five breaths breathing in the hips up position, then do 6-12 reps of the bear to down dog. Perform twice daily for 2-4 weeks.

Conclusion

Scapular winging is not solely a scapular issue. It's a complex interaction between the scapula and the ribcage. Addressing ribcage expansion can provide a stable base for the scapula to glide efficiently, reducing undue stress on the rotator cuff muscles.

By focusing on improving the dynamics of your ribcage, you can create a better environment for your shoulder blade, leading to enhanced mobility and reduced discomfort. Remember, a well-supported scapula is key to healthy shoulder function.

Why Your Mobility and Stretching is Not Working

Unlocking True Mobility: The Power of Relaxation Over Force

In the world of fitness, the pursuit of improved mobility often takes a backseat to the prevailing belief of "harder, faster, stronger." Unfortunately, this mindset can lead individuals to overlook a crucial aspect of mobility training – the difference between forcing the body into a stretch and the transformative power of progressive relaxation. In this blog post, we'll delve into why your mobility training might not be working and explore the misconception that more effort always yields better results.


The Misconception of "More Effort = Better Results":

1. Fight or Flight vs. Rest and Digest:

One of the primary reasons more effort doesn't always translate to better mobility is the impact on the nervous system. More effort tends to activate the sympathetic nervous system, triggering the "fight or flight" response. When our nervous system perceives a threat, it tightens muscles and restricts movement, hindering the very progress we aim to achieve in mobility training.

2. Creating a Safe Environment:

Mobility work involves repositioning drills and stretching exercises to reach new ranges of motion. However, if the body interprets these positions as threatening, progress becomes stunted. For lasting improvement, it's crucial to create an environment where the body feels safe and secure, encouraging the activation of the parasympathetic nervous system – the "rest and digest" state.


The Sympathetic vs. Parasympathetic Nervous System:

1. Sympathetic Nervous System (SNS):

  • Activated during stress or perceived threats.

  • Triggers the "fight or flight" response.

  • Can inhibit mobility gains due to heightened muscle tension and restricted movement.

2. Parasympathetic Nervous System (PNS):

  • Activated during relaxation and rest.

  • Promotes the "rest and digest" response.

  • Facilitates improved mobility by reducing muscle tension and allowing for greater flexibility.

The Role of Controlled Respiration (Breathing):

1. Breath and Parasympathetic Activation:

  • Controlled breathing is a powerful tool to shift the body into the parasympathetic nervous system.

  • If you can't breathe comfortably in a position, you likely don't own it, and your body may interpret it as a stressor.

2. The Importance of Feeling Safe:

  • A relaxed state during mobility drills signals safety to the nervous system, allowing for greater adaptability and long-term improvement.

“I felt great for a few hours after my massage and then it went right back to what it was before”

- says almost everyone

The Missing Link: Training After Mobility Work

While mobility drills and breathing exercises are critical to unlocking new ranges of motion, there's a common mistake many people make – they stop there. Whether it's after a massage, physio, or chiropractic session, too often people experience temporary relief, only to have their body revert back within hours or days. Why? Because the nervous system hasn't been taught what to do with that new range of motion.

In order to retain and solidify the mobility gains you've just achieved, it's essential to follow up with training or neural stimulation. Your body needs to experience controlled movement in this new range so that it can "remember" and integrate it into your movement patterns.

Why Training Is Key:

When you mobilize, you're creating new possibilities for movement. But without reinforcing it through strength training or neuromuscular engagement, your nervous system doesn't fully integrate these gains. This often leads the body to revert to its previous, more limited movement patterns. By training after mobility work, you’re helping your body understand and use this new range of motion effectively, preventing the regression that so many experience.

Think of it this way: Mobility gives you the access to more range, and training teaches your body how to control and own that new range. To retain and sustain long-term mobility, it's crucial to follow the process of mobilize, then train.

Recap: The One - Two Punch

The key takeaway from the misconception of "more effort, better results" in mobility training is the importance of relaxation over force. However, once you've created a safe and relaxed environment for mobility, the next step is to train or engage in some form of neural stimulus to lock in that newfound range. By understanding the role of the nervous system and the value of progressive relaxation followed by structured movement, you unlock not just short-term gains but sustainable, long-term flexibility and functional movement.

Embrace the power of relaxation, and remember – mobilize, then train for lasting results.

For Free mobility videos click here or to book in a Free Onboarding Call click here.